

Are you looking for a delicious, no-fuss snack that’s packed with energy and can be whipped up in minutes? Look no further than these No-Bake Peanut Butter Energy Cookies! Perfect for busy mornings, post-workout fuel, or whenever you need a quick energy boost, these cookies offer a perfect balance of healthy fats, fiber, and protein. And the best part? They don’t require turning on the oven! Whether you’re a seasoned baker or a kitchen newbie, this simple recipe is sure to become a staple in your snack rotation.
Why You’ll Love This Recipe
No-Bake Peanut Butter Energy Cookies are the ultimate combination of health and indulgence. These cookies offer a smooth, nutty peanut butter flavor combined with oats and a touch of sweetness from honey or maple syrup. What’s not to love? The recipe is incredibly versatile, allowing you to adjust ingredients to suit your dietary preferences or what you have on hand. They’re naturally gluten-free and can be made vegan if you choose the right substitutions.
These cookies also pack a punch when it comes to nutrition. Full of fiber from oats and healthy fats from peanut butter, they provide long-lasting energy that helps keep you satisfied. They’re the ideal snack to fuel your day, whether you’re heading out for a run, need a quick breakfast, or simply crave something satisfying without the guilt.
Ingredients
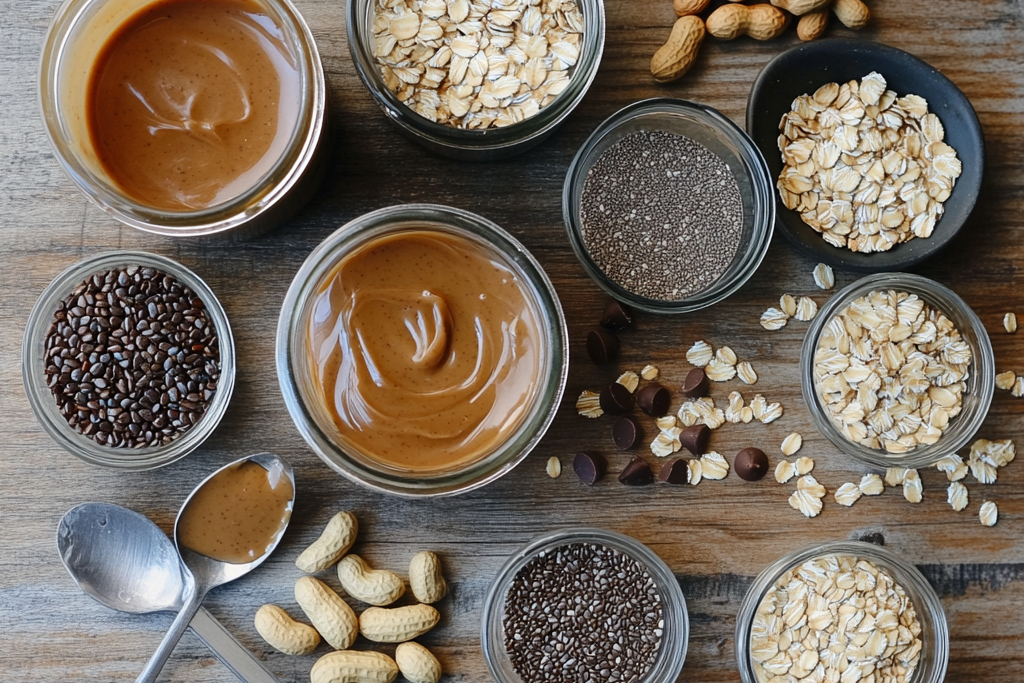
Here’s what you’ll need to make these irresistible No-Bake Peanut Butter Energy Cookies:
- 🥜 1 cup creamy peanut butter (or almond butter)
- 🍯 1/3 cup honey (or maple syrup for a vegan option)
- 🌾 1 1/2 cups rolled oats (gluten-free if needed)
- 🍫 1/4 cup mini chocolate chips (optional for extra sweetness)
- 🧂 1/2 teaspoon vanilla extract
- 🧂 1/4 teaspoon salt
- 🥜 2 tablespoons chia seeds (optional, for extra fiber)
- 🍶 2 tablespoons ground flaxseed (optional, for additional nutrients)
Necessary Tools
To make these cookies, you won’t need anything fancy—just a few basic kitchen tools:
- Mixing bowl
- Spoon or spatula for stirring
- Measuring cups and spoons
- Parchment paper or wax paper for easy cleanup
- Refrigerator or freezer (for setting the cookies)
Ingredient Swaps and Additions
One of the best things about this recipe is how flexible it is! You can easily swap out or add ingredients based on your preferences or dietary needs. Here are some ideas:
- Nut Butters: You can swap the peanut butter for other nut butters like almond butter, cashew butter, or sunflower seed butter for a different flavor or to accommodate nut allergies.
- Sweeteners: Use maple syrup, agave nectar, or even stevia if you prefer a lower-sugar alternative.
- Add-ins: Feel free to toss in extras like dried fruit (raisins, cranberries, or cherries), shredded coconut, or protein powder for an extra boost.
- Gluten-Free Oats: For those with gluten sensitivities, be sure to use certified gluten-free rolled oats.
- Chocolate Chips: If you want to keep things dairy-free, opt for vegan chocolate chips, or omit them entirely for a healthier snack.
Step-by-Step Instructions
1. Prepare Your Workspace
Start by lining a baking sheet or tray with parchment paper or wax paper to make it easy to remove the cookies later. This also ensures there’s minimal cleanup afterward.
2. Mix the Wet Ingredients
In a large mixing bowl, add the peanut butter and honey (or maple syrup). Stir them together until well combined. The peanut butter should be creamy and smooth, and the honey or syrup should blend in easily. If you’re using coconut oil to make the mixture slightly smoother, now is the time to add it (about 1 tablespoon).
3. Add Dry Ingredients
Next, add the oats, vanilla extract, and salt to the peanut butter mixture. Mix everything together with a spoon or spatula until fully combined. At this point, you can also add optional ingredients like chia seeds, flaxseed, and chocolate chips. Mix thoroughly to ensure the dry ingredients are evenly distributed.
4. Form the Cookies
Once the mixture is fully mixed, use your hands to scoop out about 1 tablespoon of the dough and roll it into a ball. Place the ball on the prepared tray and gently flatten it with your fingers to form a cookie shape. Repeat this process until all the dough is used up.
5. Chill and Set
Once your cookies are formed, place the tray in the fridge or freezer for about 30-60 minutes, or until the cookies have set. This step helps them firm up and hold their shape. If you’re in a hurry, the freezer is a great option!
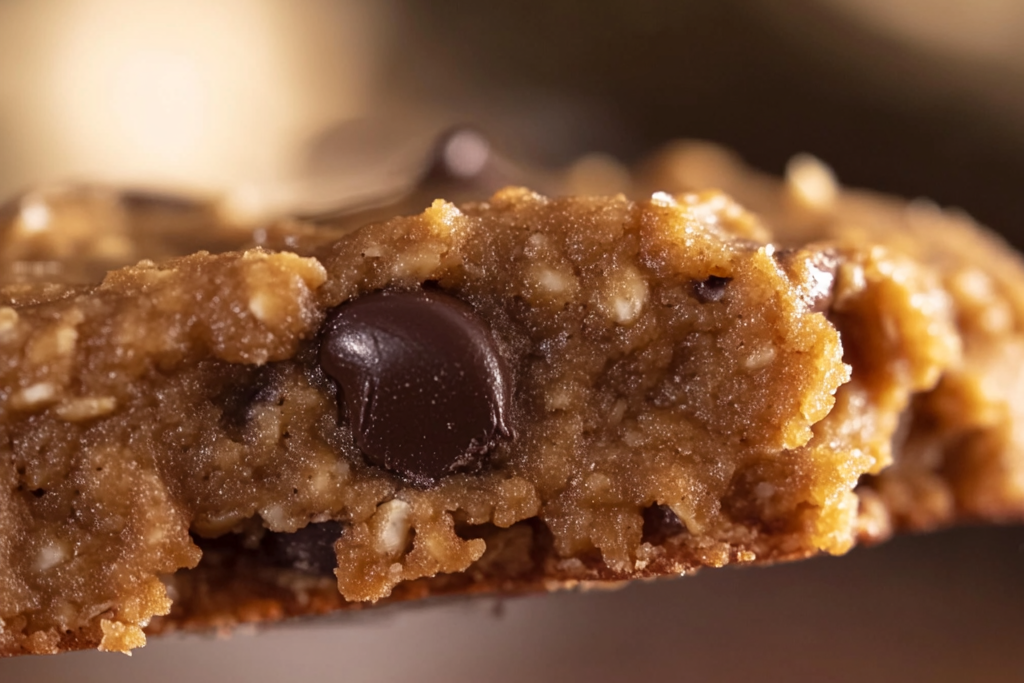
6. Enjoy!
Once the cookies have set, they’re ready to be enjoyed! Store them in an airtight container in the refrigerator for up to a week, or keep them in the freezer for longer storage.
Pro Tips for Success
- Chill for the Right Texture: The key to getting a great texture is chilling the cookies until they firm up. If they’re too soft, they won’t hold together well.
- Experiment with Flavors: Don’t be afraid to get creative with the flavor combinations. Add a sprinkle of cinnamon, a handful of dried fruit, or even a pinch of sea salt to enhance the taste.
- Use a Cookie Scoop: A cookie scoop helps make evenly-sized cookies that will set at the same rate. It also makes the process faster!
- Check Consistency: If the dough feels too runny or too dry, adjust by adding a bit more oats or peanut butter until you reach the right consistency.
- Make Ahead: These cookies can be made ahead of time for a quick snack throughout the week. Just store them in the fridge or freezer for easy access.
Serving Suggestions
No-Bake Peanut Butter Energy Cookies are perfect for any time of the day. Here are a few creative ways to serve them:
- As a Breakfast Option: Pair these cookies with a smoothie or a cup of coffee for a quick and satisfying breakfast.
- Post-Workout Fuel: The protein and healthy fats in these cookies make them an ideal recovery snack after exercise.
- On-the-Go Snack: Store them in your bag or lunchbox for a healthy, energy-boosting snack throughout the day.
- With Yogurt: Serve a couple of cookies alongside a bowl of Greek yogurt for a more filling snack or light dessert.
Storing and Reheating
To ensure your No-Bake Peanut Butter Energy Cookies stay fresh:
- Storing: Store these cookies in an airtight container in the refrigerator for up to 7 days. If you prefer, you can store them in the freezer for up to 3 months.
- Reheating: These cookies don’t require reheating, but if you prefer them warm, you can microwave them for about 10-15 seconds.
Nutritional Information
Here’s an estimated nutritional breakdown per cookie (based on a batch of 12 cookies):
- Calories: 160
- Fat: 10g
- Saturated Fat: 2g
- Carbohydrates: 15g
- Fiber: 3g
- Sugar: 8g
- Protein: 4g
These values are approximate and may vary depending on the ingredients used.
FAQs
- Can I use crunchy peanut butter? Yes! Crunchy peanut butter will add a nice texture to the cookies, so feel free to use it if you prefer.
- Can I make these cookies without honey? Yes! You can replace honey with maple syrup or agave nectar for a vegan alternative.
- Can I add protein powder to these cookies? Absolutely! You can stir in a scoop of your favorite protein powder to boost the protein content of these cookies.
- Are these cookies gluten-free? Yes, as long as you use certified gluten-free oats, these cookies are naturally gluten-free.
- How can I make these cookies lower in sugar? You can reduce the amount of honey or maple syrup, or use a sugar substitute like stevia to lower the sugar content.
Conclusion
No-Bake Peanut Butter Energy Cookies are a perfect balance of taste and nutrition. With simple ingredients and minimal preparation, these cookies are a fantastic snack or breakfast option for busy individuals. They’re customizable, easy to make, and packed with the nutrients you need to stay energized throughout the day. Whether you’re grabbing one as a quick snack, fueling your workout, or enjoying it with a cup of coffee, these cookies are sure to become a go-to favorite.
